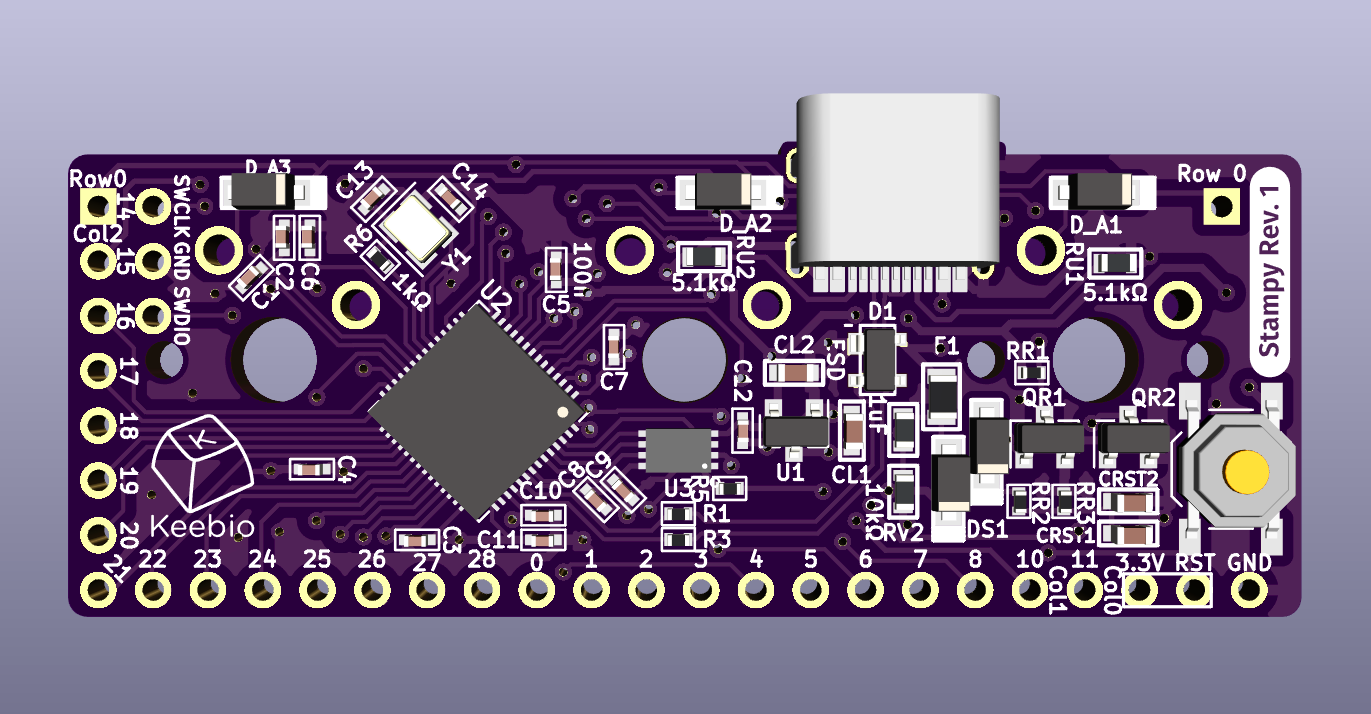
Stampy Usage Guide
The Stampy is a controller board meant to assist with the construction of a handwired keyboard. Instead of using some other daughterboard like the Pro Micro, Elite-C, etc., Stampy gets soldered directly to 3 switches, meaning that no extra space below the controller is needed.
Features
- RP2040 Microcontroller
- Compatible with both Cherry MX style switches.
- 26 I/O pins available for your rows and columns, or other IO functions such as LEDs and RGB strips
- 3 pins are preset for columns, and 1 pin is preset for a row
- Can cover well over 100 switches
- USB Type-C connector
- QMK-compatible
Versions
- Rev. 1 Prototype #1
- Black PCB
- 16Mbit (2MB) of flash memory
- No VBUS detection circuit
- Has access to GPIO9 (production version loses this pin due to it being used for VBUS detection)
- Lack breakout pin for RST (Reset)
- Rev. 1 Prototype #2
- Purple PCB marked with
X3on top-side of PCB without Elephant logo - 8Mbit (1MB) of flash memory
- Has VBUS detection pin on GPIO9
- 3.3V breakout pad is not connected to anything
- Purple PCB marked with
- Rev. 1 Production
- Purple PCB marked with
X3on top-side of PCB with Elephant logo - 16Mbit (2MB) of flash memory
- Has VBUS detection pin on GPIO9
- Purple PCB marked with
Pinouts and Assignments

Stampy has the following GPIO pins available: 0-8, 10, 11, 14-28.
4 of the pins are connected to the 3 switch locations in the following way:
- Row 0 - GPIO14 (All 3 switches are connected to Row 0)
- Column 0 - GPIO11 (Left switch)
- Column 1 - GPIO10 (Center switch)
- Column 2 - GPIO15 (Right switch)
- The reset button is connected to RST and 3.3V (not GND)
GPIO9 is used for VBUS detection, so if you are using QMK, make sure you add the following line to your keyboard's config.h:
#define USB_VBUS_PIN GP9
The rest of the pins (0-8, 16-28) can be used in whatever manner you'd like, such as additional rows/columns or devices like OLED screens and pointing devices.
Flash Mode
To enter flash mode:
- Short the two pins
RSTand3.3Vor hold reset button for at least one second before release. - Alternatively, if QMK has been loaded, double tap the reset button.
- The soft reset
QK_BOOTin QMK works as usual.
Audio
In QMK, RP2040 requires extra configuration for audio:
- In the HAL configuration
halconf.h, enable the use of PWM:#define HAL_USE_PWM TRUE. - In the MCU configuration
mcuconf.h, enable the use of corresponding PWM peripherial#define RP_PWM_USE_PWM<peripheral_number> TRUE. - In the firmware configuration
config.henableAUDIO_PIN,AUDIO_PWM_DRIVER, andAUDIO_PWM_CHANNELaccordingly.
Do consult the RP2040 datasheet to enable the correct peripheral and channel for the chosen pin.
For example, if the pin GPIO7 (which uses PWM3 B) is chosen to be used to connect a piezoeletric buzzer, then these are the configurations:
// config.h
#define AUDIO_PIN GP7
#define AUDIO_PWM_DRIVER PWMD3
#define AUDIO_PWM_CHANNEL RP2040_PWM_CHANNEL_B
// halconf.h
#pragma once

#define HAL_USE_PWM TRUE

#include_next <halconf.h>
//mcuconf.h
#pragma once

#include_next <mcuconf.h>

#undef RP_PWM_USE_PWM3
#define RP_PWM_USE_PWM3 TRUE
The Adafruit's Macropad is an example of working audio for RP2040.
Switches
Due to the tight spacing of components, if you are using 5-pin switches, you will need to clip both of the plastic pins for the Center switch and the left plastic pin for the Right switch.